Hi Friends! Happy Thursday! Welcome to week 2 of the Harken QAL
I hope last week went well for you all. I loved seeing all the posts of your lovely fabric pulls and am even more excited to see them come together. My daughters have officially started their new school year and I am officially on the "summer is over" schedule. Anyone else?
Just a reminder, you'll need to be officially signed up for the Harken QAL to be eligible for weekly prizes or able to join the private FB group. Head over to the sign up page, valid until Sunday!
This week we'll be cutting our fabric and getting organized for sewing. I don't know about you all, but this step is a little bit of a necessary evil for me. Although it's my least favorite step, I feel so satisfied and excited when I complete my cutting and everything is in nice neat piles ready to go.
Please note that the cutting instructions will be different for the two versions. I'll be showing and talking about both. For the Classic Version you will use strips to create the 4 patch units. For the Scrappy Version, you will use individual squares.
For me, the most important thing is that my space feels organized and tidy prior to starting a new quilt. You too? If that is the case for you, this would be a great week to spend a little time in your sewing space and making sure that all the pieces are in place for you to smoothly move through the steps of making your Harken Quilt.
You'll need the following "essentials":- A self healing cutting mat, I recommend 24" x 36".
- A rotary cutter with a sharp blade; I use a 60" rotary.
- A quilting ruler, I recommend 6" x 24".
- A tray, box, basket or other container for keeping all of your cut pieces organized.
- The Harken Quilt Pattern, printed out and cutting instructions for your size highlighted or circled. You could just print out the cutting instruction page/s.
A note about pre washing fabric:
I do not pre wash my fabric. It's just an additional step that I don't usually take. If you prefer to prewash your fabric, I would recommend pressing it a bit prior to cutting. Some people like to use a light starch during pressing as this can make cutting your fabric much easier.
Also be mindful of "squaring up" your fabric prior to cutting. For more on how to square up your yardage prior to cutting, please find my YouTube video HERE.
I have a lot of work to do on my video making skills, but I do love the format and hope to be making more videos to share tips and thoughts on quilting in the future. It would help me a lot if you hit the "like" button and subscribe to my little channel. Thanks a bunch!
Let's Get Started:
Before you begin, I recommend going over the lap size cutting instructions and maybe even highlighting, underlining or circling them.
One other thing to note - there are lots of ways/methods of cutting all manner of strips and squares from yardage or scraps. The following is how I personally like to do it, if you have a way that you prefer, it's all the same to me. As long as your cuts are accurate, everything will come together just fine.

Before I start cutting my yardage I always clean up the edge and "square it off". It is especially important that you cut "on grain" when cutting strips to sew. Otherwise your strips will likely end up wonky and your finished quilt may not lay flat. (If this is new to you, please find my video on finding the straight of grain to ensure straight cuts, HERE). Place the fold toward you on your cutting mat with the raw edge over the left side measure line or 0 mark.

Using your quilting ruler and rotary cutter, cut a clean line right at the 0 mark on your mat. This will give you a clean accurate edge to begin cutting.

Classic Version -
So let's talk about cutting for the Classic Version. The classic version cuts are pretty straightforward.
After cutting your strips (for background and Fabric A) and setting aside the required amount, I like to carefully layer two folded strips. This gives me 4 pieces of fabric for each cut. Then I cut my 128 rectangles and 64 squares, as stated. This goes much faster with the strips layered. I would not recommend cutting through any more than 4 layers as it can start to shift your fabric in a way that makes your cuts crooked.


As you cut, keep your pieces in groups of 4 (or whatever number you like to multiply) so it's easy to keep track of how many you have. I am constantly getting sidetracked or called away from my cutting table in the middle of cutting and forget how many I have cut. Keeping them in groups that I can quickly count up later, helps me get right back on track and know how many I still need when I return.

Next you'll cut your strips. This is straightforward. Again, I would keep them in groups, especially if you think you won't complete all the cuts in a single session.
If you are using a third color for the small squares, I want to clarify. You can use yardage OR a fat quarter. I have given instructions for using yardage (1/8 yard) if that is what you have, however one FQ will yield all the squares you need for each size. In fact a F8 will work for the Baby and Throw size. You'll need to choose based on what you have in front of you or what you have purchased or intend to purchase.
Once all of your pieces have been cut, place them in some type of container in order to keep them organized until you are ready to sew. No need for labeling the pieces since the pattern is so straightforward. It's pretty obvious what each piece is.
Scrappy Version-
Let's start with the background fabric again. This time you'll cut the strips but then sub cut as directed rather than setting some aside. Using my 24" quilting ruler, I cut 7 strips at a time (that's what my ruler fits across comfortably). Leave them flat on my cutting mat, then cut off the bottom fold. From there I cut horizontally across the WOF every 3". You'll need 9 strips total to get 126 squares. You'll get the last two squares from one of the other strips. Set aside your squares.
With the remaining strips, you'll cut your rectangles. I only needed 17 strips to get my 128 rectangles and two additional squares. IF you have yardage that only has 42 usable WOF inches then you will need the amount called for in the pattern. My usable WOF inches was 44.5 so I was able to get 8 rectangles per strip.
For the small strip/sashing pieces, just follow the pattern instructions.
Okay, so here's where things get a little less straightforward. But don't worry, it's all laid out on page 5 and I'm going to walk you through it right now.
You'll need 192 total Fabric A squares for the lap size we are making. You can use fat quarters, yardage or your existing scraps (as long as the scraps fit the size requirements). The question is, "how many of each color or print do you cut?" Do you want a sort of equal amount or are you fine to just put all the pretty color scraps you have in there and let them do their scrappy thing? There is no "right" way to do the scrappy version. You just want to have a plan so you know what to cut.
If using a specific amount of FQs, that's super easy. Let's say you have 16 Fabric A FQs. You'll divide the amount of total squares needed (192) by the amount of FQs you'll be using (16) and you get 12. That means you'll cut 12 squares from each Fabric A FQ. Let's try another one: 22 FQs goes into 192, 8ish times. So if you're using 22 FQs you'll need to cut 8/9 of each one. See the explanation on page 5 of the pattern.

I'll be using 20 different prints for my scrappy version. My plan is to go "full scrappy" and not do anything different than the pattern calls for within the blocks, for example, I'm not going to try to make all the inside squares a certain color, or alternate any prints in specific way, etc. I'm just going to sew the pretty scraps I have and let them dance around the quilt. So let's do the math, 192/20= 9.6. I'll be cutting 9 to 10 squares of each print.
One quick and possibly obvious tip: layer your scrappy fabric (no more than 4) prior to cutting. This way you can get multiple pieces out of each cut. My You Tube Short video can be found HERE.
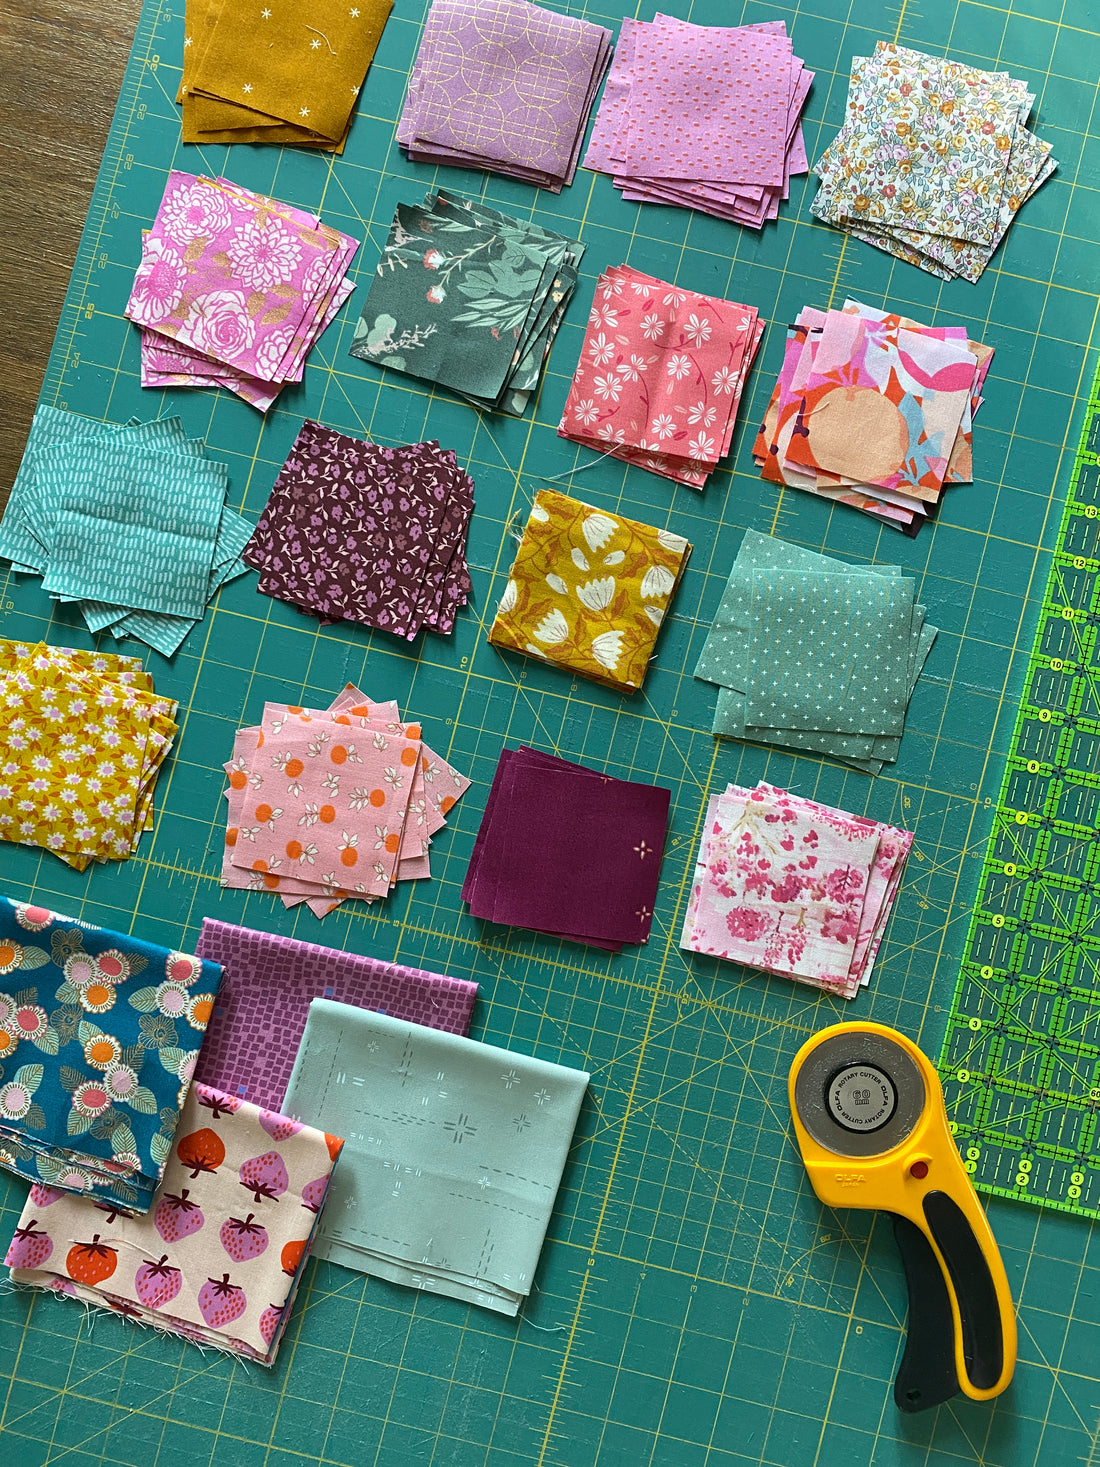
I am using F8 so I'll still have half my F8 left over. I plan to use this for my scrappy binding (those are the strips that are folded up in the basket in the photo below). I recommend cutting that leftover strip to 2.5" at the time of cutting so you don't have to do it later. More short videos detailing my process a bit further can be found HERE, HERE, HERE and HERE.
Finally, you'll finish up this week's cutting with your 49 Fabric B, small squares (pictured in the wooden bowl). These are quick and easy. Just as in the Classic Version, they can be cut from a FQ or yardage. No explanation necessary, simply refer to page 5.

Again, place all your cut stacks/groups in a container of your choice. I like something sort of decorative that makes for a nice photo but anything that keeps the pieces organized and contained is fine.
Don't forget your photo for this week. In order to be eligible for this week's prize from Lamb and Loom.

Linli is offering 2 Florida V2 Charm Packs By Sarah Watts. Please post your process or finished piles photo/reel to Instagram by Tuesday. Winner will be announced on Wednesday!
Leave a comment below (or head over to the private FB group- only open to QAL participants) and tell us how it's going or what your thoughts are about the cutting step. Love or hate it? Do you need to get organized before starting or are you good to just dive in? Pre wash or not? Let us know how it's going my friends. Hope you all have a great week!
Bye for now... ~Karen